


 China Import and Export Fair
 Focus On Products
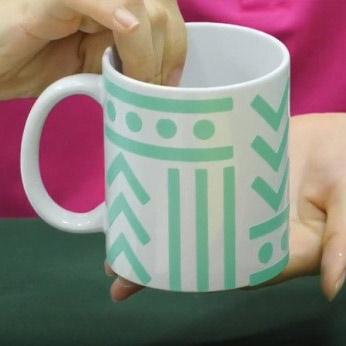
Hello, friends, welcome to today’s Heyi tutorial. Winter is coming, remenber to keep warm. Cold winter weather can make all of us feel a little under the weather. We can drink hot water from a cup, to bring a little warmth in the cold winter.
So, Learn how to make DIY vinyl decals and decorate all the things with adhesive vinyl! Adhesive vinyl is a thin, flexible, self-adhesive material that is typically used to creat wall and window decals and business signage. It’s durable can also be waterproof which makes it very versatile. In today's step by step tutorial, I'll show you how to make a mug even more creative by simply applying matte adhesive vinyl to it.This matte adhesive vinyl has excellent dismensional stability and very good cutting and application characteristics.
Supplies Needed:
* Matte Adhesive Vinyl, clear transfer vinyl
* scissor or cutting machine
* mug
1. design needed pattern or letter.
")
Design the pattern you want on your computer and adjust the size of your mug appropriately. We will apply the matte adhesive vinyl to decorating the mug. Of course, you choose any other color. This vinyl is a calendared vinyl with the fine performance of water-proof and UV-resistance. The temprory adhesive is perfect for removing the designs without residues on the object surface.Our product mainly can be used to beautify your life and world.
2. using scissor to cut off
")
Use scissor or cutting machine to cut the matte adhesive vinyl to the right size .It is easy to be cutting, you just cut your designs, weed it easily, and apply it at your will. This excellent vinyl is for use with all cutting machines and cutting plotters. Even your most complicated designs can be separated/ released easily from the liner for a perfect application.
3. Weed Designs.
")
After cutting is complete, cut around the design to remove it from the sheet of vinyl and then peel away the excess Adhesive Vinyl from around the design. Then, use a weeding tool to remove the smaller pieces of Adhesive Vinyl from inside the letters.
4. Apply clear transfer vinyl.
Cut a piece of clear transfer vinyl to the same size as your design and stick on the pattern. Then, use your hand or scraper tool to burnish the clear transfer vinyl over the design. The clear transfer vinyl can keep the original place of shape. The clear transfer vinyl is a strong bond one and is mainly used for transferring the materials with rough finish, like the matte adhesive vinyl or wooden adhesive vinyl. The adhesive transfer vinyl performs well for transferring projects on other ojects and there is no residue on the surface of your projects. The picture below is a clear transfer vinyl.
")
5. Transfer pattern.
Attach the decal to the cup in place and use the scraper tool or your fingers to press the design onto the surface. Peel away the clear transfer vinyl leaving behind the matte Adhesive Vinyl pattern.
*Tip- When peeling Transfer Tape off an Adhesive Vinyl design, it's always best to start from the corner and peel downward at an angle.
")
Done! That's all the steps for applying matte adhesive vinyl to mug.
At last,all the materials I used today is all from Heyi. Matte adhesive vinyl is not only used for DIY, it is perfect for indoor use on walls, glass, plates, and any application that will be used indoors. It comes with a matte finish, which keeps glare away. It's rated for 2-3 years, Matte Adhesive Vinyl so affordable and easy to work it. It can be applied to a variety of surfaces. The mug cup I used here is metal, but you could also use glass, plastic or even wood. Check out some other tutorials with Adhesive Vinyl on the website www.adheisvematerial.net.
If you have any questions, you can leave your comment on our website.
Thank you for your watching, hope you have a great time!