


 China Import and Export Fair
 Focus On Products
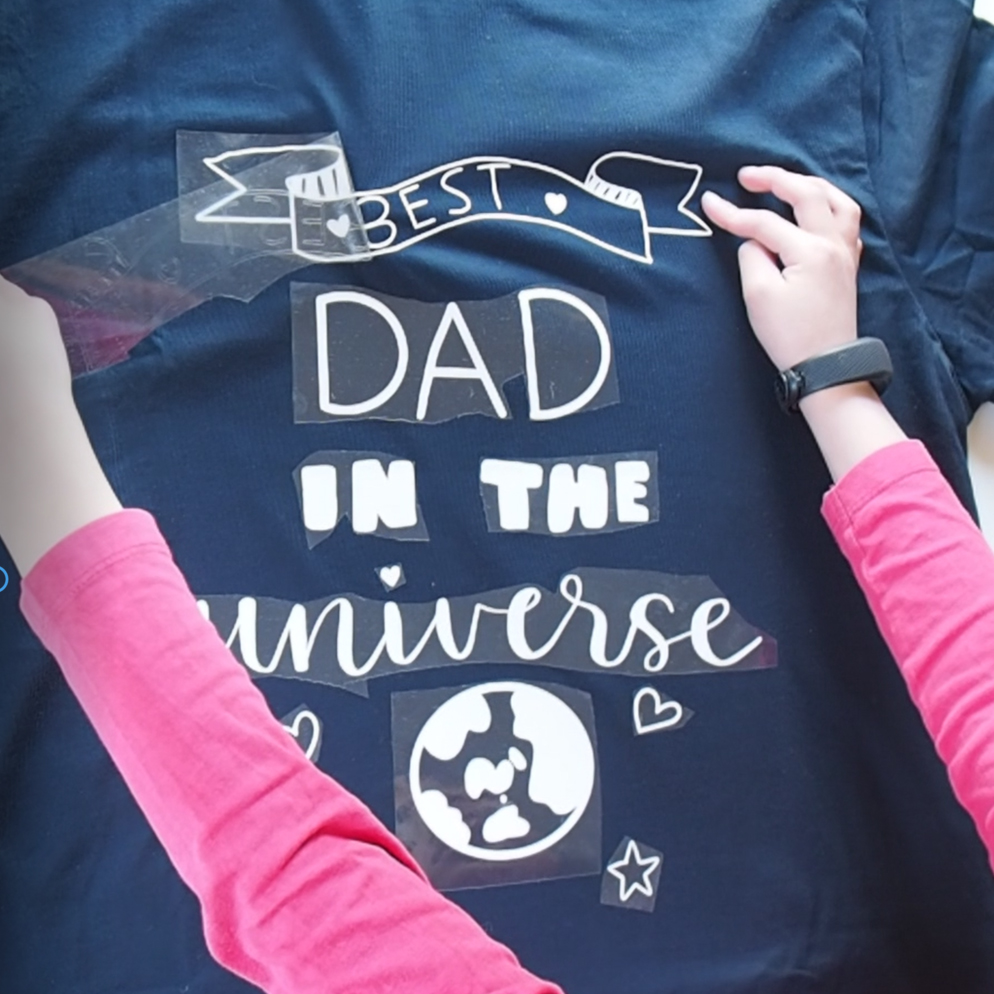
Disclaimer: The content, thoughts and opinions in this blog are purely my own. I was not paid by Cricut however I was provided with a Cricut Maker, EasyPress2 and other accessories. This post contains affiliate links and I may be compensated if you make a purchase after clicking on my links at NO additional cost to you. I have provided links to the official Cricut store, International and Australian resellers.
My kids absolutely LOVE crafting and they’re always excited to see what I am doing. So naturally I wanted to involve them in my first project with my new Cricut Maker and EasyPress2. As Father’s Day is just around the corner, my eight year old daughter wanted to design a new pajama top for their Dad.
Those of you who have followed me for a while will know that previous to this blog, I have always used a Cricut Explore Air 2 machine with a standard iron for my iron-on projects. As my iron is low heat, I have always just ironed directly on the iron-on without using a separator (like paper/cloth in between, much to the horror of many people). It’s never been a problem for me as my iron does not generate enough heat to melt the plastic however it does take five times longer and much more pressure than if I used a stronger iron or the official Cricut EasyPress machines. So needless to say, when I received the EasyPress2 from Cricut, it was a complete game changer. Firstly, I can use the online Cricut Heat Guide to find out EXACTLY how long I need to apply heat on for, the amount of pressure I need to use, as well as the specific temperature for my fabric.
There are of course many ways to personalise clothing, but to share how we created our Pajama top for Fathers Day, I’ve broken down what we did into three parts;
PART ONE : DESIGN
PART TWO : CUT/WEED
PART THREE : APPLICATION.
PART ONE : DESIGN
I personally LOVE lettering on the iPad Pro with Procreate, it is so easy to use and is compatible with my Cricut machines. Unfortunately the Apple Pencil and Procreate is only compatible with iOS, so if you are on another platform, the first part of this blog (PART ONE: Design) will not be applicable to you. Instead, you may create your design on paper, scan it and upload it to the Cricut Design Space software.
Part 1 DESIGN : STEP ONE
Using an Apple iPad Pro and Apple Pencil, my eight year old daughter designed her artwork for her dad’s pajamas on the Procreate app.
She used a combination of the monoline brush (included in the calligraphy brush panel on Procreate) and my custom calligraphy brush to create her design.
Part 1 DESIGN : STEP TWO
Once you have completed your design, make the background colour transparent. You can do this by going into the Layers panel, and deselect the Background Colour checkbox.
Part 1 DESIGN : STEP THREE
Select Share and export your artwork as a .PNG file to your iPad.
Part 1 DESIGN : PRO TIP
By creating your design in different layers, you can export your design as separate layers. This may allow you to rearrange your design on Cricut Design Space later on, to minimise the materials you will use and minimise wastage.
PART TWO : CUT/WEED
Part 2 CUT/WEED : STEP ONE
On your iPad/PC open the Cricut Design Space application, and click on New Project.
Part 2 CUT/WEED : STEP TWO
Upload your .PNG image/s. Insert image/s to canvas. If you have multiple .PNG images, arrange the images close together so that you minimise wastage. Measure the size of your garment and resize the image in Cricut Design Space to make sure that your creation fits your garment.
Part 2 CUT/WEED : STEP THREE
When you are ready, click on Make It. Power on your Cricut Maker or other Cricut device and select it as your Assessory. In the top left hand corner, click on the mat icon and remember to turn on Mirror (for iron-on). Click on Continue.
Part 2 CUT/WEED : STEP FOUR
Set Material as Everyday Iron-On. Remember to turn Mirror ON for Iron On projects.
Part 2 CUT/WEED : STEP FIVE
Prepare your Standard Grip Mat by cutting a piece of Iron-On to the size as indicated on Cricut Design Space. Remember to put the SHINY side downwards (the matte side facing up). Insert your prepared mat into your machine and PRESS GO!
Part 2 CUT/WEED : STEP SIX
After the cutting is complete, remove your mat from the machine. Carefully remove your Iron-On from the mat.
Part 2 CUT/WEED : STEP SEVEN
Using a pair of scissors, cut off any excess Iron-On, you may be able to use this for future projects.
Part 2 CUT/WEED : STEP EIGHT
Now the fun part - weeding! Using a weeding tool, gently remove the excess Iron-On and the white space from the inside of letters, revealing the clear/transparent backing of the Iron-On. Your creation should remain on this backing, DO NOT remove your creation from this. If you tried the Pro Tip (above) and have condensed your working space, you may need to use a pair of scissors and cut out your individual pieces.
PART THREE : APPLICATION
Part 3 APPLICATION : STEP ONE
Set up your Cricut EasyPress 2 machine (or iron) on a firm heat-proof surface. I will be using my EasyPress Mat. Using the Cricut EasyPress Heat Transfer Guide select the EasyPress machine you are using, followed by the Heat Transfer Material (Everyday Iron-On) and the base material (our pajama top for Dad is cotton). The Guide tells me that I will need to set my EasyPress to 155 degrees Celcius, for 30 seconds.
Part 3 APPLICATION : STEP TWO
To set up my EasyPress, click on the power button. Next, click on the thermometer button and then using the + or - buttons set the temperature to 155. Next, click on the timer button and again, using the + or - buttons, set it to 30 seconds. Once the heat has reached your desired temperature, the machine will beep and the Cricut button will turn green. You are ready to start!
Part 3 APPLICATION : STEP THREE
Prepare your garment by making sure it is flat, use the EasyPress or Iron on it to heat it up for 15 seconds. Then arrange your design (shiny side up! Your design should be visible through the clear plastic, and should be the right way up). I use a ruler to ensure everything is centred nicely.
Part 3 APPLICATION : STEP FOUR
Once everything is arranged perfectly, place your EasyPress or Iron over your design. Follow the pressure instructions in the Heat Guide (mine said Light Pressure) and click on the Green Cricut button. The countdown begins! Apply pressure, but don’t move your EasyPress around. Once the time is up, remove your EasyPress!
Part 3 APPLICATION : STEP FIVE
The Heat Guide advised me to peel the backing whilst it is still warm. Follow the Heat Guide for your garment. Carefully peel off the backing, and if required, reapply heat and pressure. VOILA, your project is now complete!
For best results: Turn your garment over and apply heat to the reverse. NEVER iron directly on top of the iron on, without the plastic backing. Remember to turn your garments inside out in the washing machine, cold gentle wash works best, and if you are ironing it before wear, turn it inside out!
I hope you enjoyed this tutorial. It’s a long one, but I hope by breaking it down to three parts: DESIGN, CUT/WEED and APPLICATION, it is simpler to do and understand. Please leave me some comments and click on like if you found it helpful!
HAPPY FATHERS DAY to the most incredible father I could wish for my children, and Happy Birthday to my own amazing father. Thank you for all that you do and have done for us.
tags: iron on, personalised clothing, fathers day, cricut maker, crafting, craft blog, crafting with kids, cricut EasyPress2, personalised gift, iron on clothes, diy craft
categories: Craft, Calligraphy, celebration, Lettering