


 China Import and Export Fair
 Focus On Products
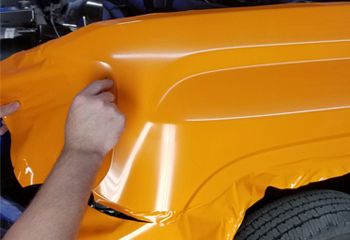
Vinyl decals are comprised of three layers:
Backer liner
Adhesive-backed vinyl decal
Front application tape
The general idea is to remove the backer liner, position the decal over a smooth, warm, clean, dry area, and then press the vinyl onto the surface from one side, smoothing the vinyl and top application tape with a credit card or plastic squeegee to avoid air bubbles and wrinkles. For more detailed instructions, read on....
Assemble these supplies:
Soap, water, and a sponge or wash rag
Rubbing alcohol or other non-ammonia glass cleaner
Dry, soft, clean cloth
Squeegee or credit card
Masking tape
Tape measure
When to apply: For best adhesion, apply decals when the surface and decal are both above 50°F.
Instructions
Wash surface with soap and water, then wipe with rubbing alcohol or non-ammonia glass cleaner that won't leave any residue. Dry with clean cloth.
Un-peel the backer liner just a little from both ends to make removal easier. If the vinyl doesn't stick to the transfer tape, compress the entire decal with your credit card or squeegee.
For best alignment on large decals, measure and mark where the decal should be placed. Mark the center lines of both the surface and decal. Position the decal where you want it and attach it with a few small pieces of masking tape.
Create a hinge with one long piece of masking tape at mid-point, extending past the edges of the decal. This is so you can work with one section at a time while keeping the rest of the decal properly aligned.
NOTE: Use the credit card or squeegee in two passes; gently when positioning the vinyl, and then firmly to ensure good adhesion.
Lift one end of the decal and peel off the backer liner from the end toward the hinge. Cut it off as close to the hinge as you can. Take care that the adhesive vinyl doesn’t touch the surface.
Holding the exposed end above the surface in one hand, with your other hand gently squeegee the decal onto the surface, working from the hinge to the end you’re holding up.
With one end in place, remove the masking tape, lift the other end, and peel away the rest of the backer liner. Holding that end above the surface, gently squeegee from the center toward the end.
The adhesive is pressure-activated and takes a while to set up or dry, so press the decal firmly in place with your plastic squeegee or credit card and then wait about a half hour before peeling away the transfer paper.
To remove the transfer paper, pull up one corner, get a grip, and then peel it back toward the other end. Hold the peeled paper close to the surface; don't pull it up and away from the surface in order to avoid loosening the decal's grip on the surface.
Inspect the exposed decal. If you see loose areas, the decal or surface probably weren't warm or clean enough. Use the backer liner, smooth side down, to press the decal against the surface. For large bubbles, prick a pinhole and press from the edges toward hole to expel the air, and press down. Ignore small bubbles; vinyl is porous, and after a few days one the water with the surface and decal heated by the sun, small bubbles will disappear.
To remove old vinyl decals, warm them with a hairdryer or heat gun so they will soften and become easier to peel away. Remove glue residues with commercial solvents like Goo Gone® or with common household solvents.
Soak the glue with vegetable oil and then scrub the area with soap and rinse with water. (Cooking oil is to oil-based glue like water is to water-based glue.) For more friction, mix one part vegetable oil with two parts backing soda.
Rub peanut butter into the glue. The peanut oil softens and dissolves the oil-based glue, and peanut butter’s texture and consistency make cleanup easier than with cooking oil.
Some glues dissolve in rubbing alcohol, so try soaking and rubbing the glue in that, too.
Vinegar will dissolve most glues, too. Saturate a paper towel with vinegar, lay it on the sticky area, and let it soak in. Then use the paper towel to wipe away the softened glue.
Whatever you use, follow-up with soap and water to remove any solvent residues.